Computer Science · Ch 13 — Project Based Learning
Approaches for Solving Projects
Approaches for Solving Projects
The way a project is approached decides how smoothly it gets built and finished. The textbook presents three broad approaches — modular, top-down, and bottom-up — and then walks through the five steps that make up project-based learning itself.
Approaches to executing a project
A structured or modular approach means the project is broken into smaller, manageable modules. Each module has a clearly defined task, a set of inputs it works on, and a well-defined output. When all these module outputs are integrated, they produce the desired final outcome. The other two approaches — top-down and bottom-up — are also mentioned as valid ways to execute a project, though the emphasis in this section is on the modular way of thinking.
Steps in project-based learning
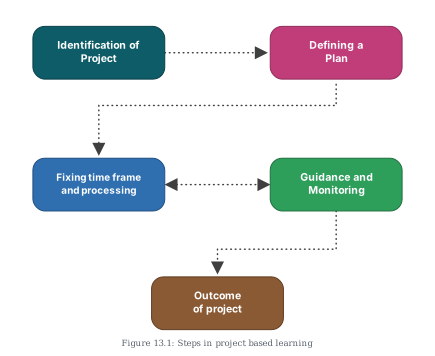
The textbook lists five distinct steps, shown in Figure 13.1 of the chapter.
1. Identification of a project
A project idea can come from any real-life situation. For instance, one could take up the task of organising a seminar as a project. Before committing to an idea, one must understand its usefulness and its impact. Students are encouraged to take up interdisciplinary projects — ones that draw on more than one subject area.
2. Defining a plan
Most projects involve several members. A project leader must be identified, and the roles of the leader and every member must be clearly defined. Each student performing the project should be assigned specific activities, and the tools needed to carry out those activities must be known in advance. A useful habit while planning is to think about extreme situations — considering the toughest or most unusual cases helps arrive at a better solution.
3. Fixing a time frame and processing
Every project is time-relevant. A student must understand the importance of a time frame for completing the project, since every activity takes a certain amount of time. A project must be well structured, yet its time frame must remain flexible — rigid deadlines that cannot adjust to reality often cause more harm than good.
4. Providing guidance and monitoring …
Drawn by us to help you understand the concept clearly, and verified to make sure it's accurate. For exams, practice from your NCERT textbook's own diagram.
Figure 13.1 lays out the five steps of project based learning as a flowchart, with each step in its own colour-coded rounded box. The diagram reads left to right, then top to bottom, and the dotted arrows between boxes show the order in which the steps are carried out.
The journey begins at the top-left with Identification of Project, a dark teal box. A horizontal dotted arrow carries you right to Defining a Plan, the pink box at the top-right. From there the path is not a simple straight drop — the dotted arrow runs down a short distance, then left across the full width of the diagram, then down again into Fixing time frame and processing, the blue box on the middle-left. That long connector is the only route from the plan to the time frame; there is no separate arrow dropping straight from Identification of Project down to this box.
From Fixing time frame and processing, two separate horizontal dotted arrows run side by side to Guidance and Monitoring, the green box on the middle-right — one arrow pointing each way, making the link bidirectional. This is the one place in the figure where the flow is not strictly one-way, and it makes sense: monitoring feeds back into how the time frame is actually being executed, and adjustments to the plan can come out of that monitoring. Finally, a single dotted arrow drops straight down from Guidance and Monitoring to Outcome of project, the brown box at the bottom, completing the sequence. …