Physical Education · Ch 2 — Children and Women in Sports
Flat Foot
Flat Foot
The human foot is a remarkable structure. It bears the entire weight of the body during standing, absorbs shock during walking and running, and provides a stable platform for propulsion. A key feature of a healthy foot is the medial longitudinal arch — the curved inner border of the foot that runs from the heel to the ball of the foot, just behind the big toe. This arch acts like a spring, storing and releasing energy with each step.
Drawn by us to help you understand the concept clearly, and verified to make sure it's accurate. For exams, practice from your NCERT textbook's own diagram.
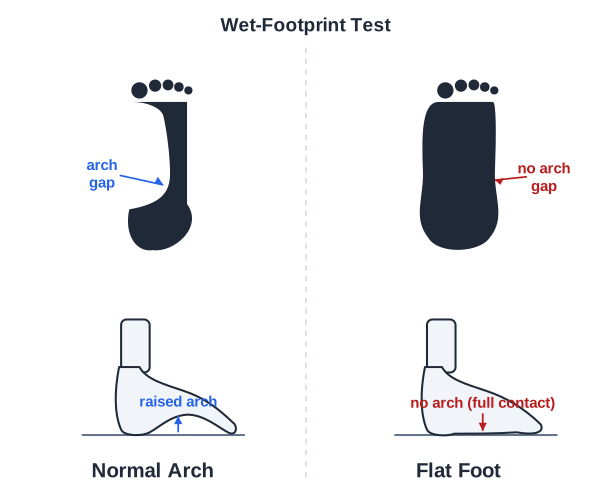
Two side-profile feet with their black footprints above them. The left panel, 'Normal Arch', shows a raised medial arch and a footprint with an arched inner cut-out; the right panel, 'Flat Foot', shows a collapsed arch and a fully filled-in footprint. This is the water-print-test co …
Flat foot, medically termed Pes Planus, is a postural deformity in which this medial arch is either absent or has collapsed. As a result, the entire sole of the foot makes contact with the ground when standing. The condition can be present from birth (congenital) or develop over time (acquired). In many young children, a flat foot is normal and resolves on its own as the foot muscles and ligaments strengthen. However, when the arch fails to develop or collapses later in life, it can lead to a cascade of problems.
The defining feature of flat foot is that the entire sole touches the ground during standing. A normal foot leaves a gap under the arch, visible as a curved inner edge in a wet footprint.
How Flat Foot is Recognised: The Wet Footprint Test
This is the simplest and most common method for identifying flat foot. It provides a visual, permanent record of the foot's contact pattern.
Procedure:
- The person sits on a chair with their foot resting on a flat, non-absorbent surface (like a tile or a piece of metal).
- The sole of the foot is moistened with water or a dilute, washable ink.
- The person then stands up, placing their full weight on the wet foot, and steps onto a piece of clean, dry paper or a white cloth.
- They step off, leaving a clear footprint.
- The process is repeated for the other foot.
Interpretation:
- Normal Foot: The print shows a clear, curved gap on the inner side where the arch did not touch the paper. The forefoot and heel are connected by a narrow band.
- Flat Foot: The print shows the entire sole of the foot, with no gap or a very narrow, straight inner border. The forefoot and heel appear as a single, broad, solid shape.
For a quick, informal check, a student can wet their foot and step onto a concrete floor or a dark tile. The drying pattern will briefly show the footprint.
Causes of Flat Foot
The causes are broadly divided into structural (anatomical) and functional (muscular/ligamentous).
- Weakness of the muscles and ligaments that support the arch: The tibialis posterior muscle is the primary dynamic supporter of the arch. If it is weak, the arch cannot be maintained against body weight. Ligaments, such as the plantar calcaneonavicular (spring) ligament, also provide passive support; if they are stretched or torn, the arch collapses.
- Excessive body weight: Obesity places a chronic, excessive load on the foot's supporting structures, gradually stretching them out and causing the arch to drop.
- Improper footwear: Wearing shoes that are too flat, too flexible, or lack arch support for prolonged periods can contribute to arch collapse. High heels can also shorten the calf muscles, altering foot mechanics.
- Prolonged standing on hard surfaces: Occupations or activities that require long hours of standing on concrete or other unyielding surfaces can fatigue the foot muscles and strain the ligaments.
- Injury or trauma: A fall, a twist, or a direct blow to the foot can tear the supporting ligaments or damage the bones of the arch, leading to an acquired flat foot.
- Genetic factors: Some individuals are simply born with a lower arch or a structural predisposition to flat feet.
- Ageing: Over time, tendons (especially the tibialis posterior tendon) can degenerate and weaken, leading to an adult-acquired flat foot.
Problems Created by Flat Foot
A collapsed arch is not merely a cosmetic issue. It disrupts the entire biomechanical chain from the foot up to the lower back.
- Pain on standing and running: The loss of the arch's spring-like action means the foot cannot absorb shock effectively. This leads to pain in the foot itself (especially the arch and heel), as well as referred pain in the ankles, knees, hips, and lower back.
- Poor balance and stability: The arch provides a tripod-like base of support (heel, ball of big toe, ball of little toe). When the arch collapses, the foot becomes unstable, making it harder to maintain balance on uneven surfaces or during single-leg stance.
- Unsuitability for certain sports and services: Activities that require running, jumping, or prolonged marching become painful and inefficient. This is a critical consideration for:
- Sports: Long-distance running, basketball, football, and athletics.
- Services: Military service, police, and paramilitary forces often have strict medical standards that disqualify candidates with significant, symptomatic flat foot because it predisposes them to stress fractures and other overuse injuries during training.
A student with flat foot may not feel pain during everyday walking, but the problem becomes apparent under the high-intensity, repetitive loading of sports or military drills. This is why it is a disqualifying condition for many physically demanding professions.
Corrective Measures and Corrective Exercises
The goal of correction is not to create a high arch where none exists, but to strengthen the muscles that actively support the arch and to improve the foot's overall function. For flexible flat feet (where an arch appears when the person sits but flattens on standing), exercise is highly effective. For rigid flat feet (where the arch is absent even when sitting), surgery may be the only option, but exercise can still help manage symptoms.
Each correction works by targeting a specific aspect of the problem.
1. Walking on the Toes and Heels
- How to do it: Walk barefoot for a few minutes each day, alternating between walking only on the balls of the feet (toes) and walking only on the heels. Keep the knees straight.
- How it works: Walking on the toes strongly contracts the calf muscles and the muscles of the foot's arch, actively pulling the arch upward. Walking on the heels stretches the calf muscles and strengthens the anterior leg muscles, which helps balance the pull of the posterior muscles that support the arch.
2. Picking Up Objects with the Toes
- How to do it: Sit on a chair. Place a few small objects on the floor — marbles, a handkerchief, a pencil, or small pebbles. Using only the toes of one foot, pick up each object and place it into a bowl. Repeat with the other foot.
- How it works: This is an excellent exercise for the intrinsic muscles of the foot — the small muscles that originate and insert within the foot itself. These muscles are the fine-tuners of the arch. Picking up objects forces them to contract and curl the toes, which dynamically lifts and shapes the arch.
3. Rope Skipping
- How to do it: Skip rope on a soft surface (grass or a mat) for short intervals, gradually increasing duration.
- How it works: Skipping involves repetitive, low-impact jumping. The foot must constantly adapt and spring off the ground. This action strengthens the entire lower leg and foot musculature, including the arch-supporting muscles. The soft surface reduces the shock that could aggravate a painful foot.
4. Vajrasana (Thunderbolt Pose)
- How to do it: Kneel on the floor. Sit back on your heels, keeping your big toes together and your heels slightly apart. Place your hands on your thighs. Keep your spine straight. Hold the pose for 1-5 minutes, breathing normally.
- How it works: This yoga pose places a gentle, sustained stretch on the top of the foot and the ankle. More importantly, it forces the toes to curl under and the arch to be passively stretched and elongated. Regular practice helps improve the flexibility of the foot and can strengthen the arch's supporting structures over time. …