Mathematics · Ch 9 — Applications of Derivatives
Second derivative test
Second derivative test
Second derivative test. A function has a maxima at if and . A function has a minima at if and .
Note. If , the second derivative test is inconclusive, and the first derivative test (§2.4.3) must be used instead.
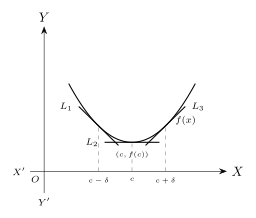
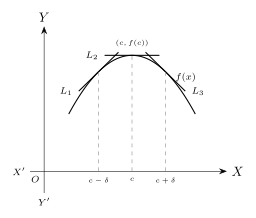
Why this works, geometrically: at a maximum, the slope of the tangent goes from positive (rising, just before the peak) through zero (exactly at the peak) to negative (falling, just after) — the slope is steadily DEcreasing as increases through the maximum, and a steadily decreasing quantity has a negative rate of change, which is exactly . Symmetrically, at a minimum, the slope goes from negative through zero to positive — steadily INcreasing — giving .
Drawn by us to help you understand the concept clearly, and verified to make sure it's accurate. For exams, practice from your textbook's own diagram.
What this figure shows. This figure sketches three short tangent-line segments, labelled , , , drawn at three points on a curve just before, exactly at, and just after a dip (a local minimum) at point . (just before ) slopes downward (negative slope), (at itself) is horizontal (zero slope), and (just after ) slopes upward (positive slope) — illustrating that the slope steadily increases through a minimum, which is the geometric picture behind the sec …
Drawn by us to help you understand the concept clearly, and verified to make sure it's accurate. For exams, practice from your textbook's own diagram.
What this figure shows. This figure sketches three short tangent-line segments, labelled , , , drawn at three points on a curve just before, exactly at, and just after a hump (a local maximum) at point . (just before ) slopes upward (positive slope), (at itself) is horizontal (zero slope), and (just after ) slopes downward (negative slope) — illustrating that the slope steadily decreases through a maximum, which is the geometric picture behind the sec …
Worked Example 1 — Basic cubic. Find the local maximum and minimum of . ; stationary points . . At : maximum; . At : minimum; .
Worked Example 2 — Wire bent into a rectangle. A cm wire is bent into a rectangle of sides ; maximise the area. . Area ; ; maximum; . So the maximum-area rectangle is a square.
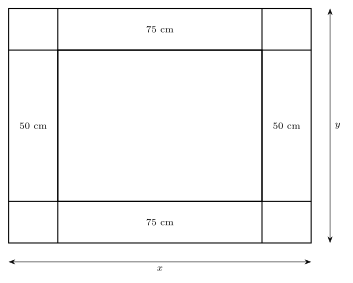
Worked Example 3 — Printed area within margins. A rectangular sheet of area m² has cm margins top/bottom and cm margins on the sides; maximise the printed area. With width and length , the printed rectangle has dimensions by , giving printed area . (rejecting ). at maximum; . So the sheet is m by m for maximum printed area (see Fig. 2.4.5).
Drawn by us to help you understand the concept clearly, and verified to make sure it's accurate. For exams, practice from your textbook's own diagram.
What this figure shows. This figure accompanies the rectangular-sheet-of-paper worked example. It shows a rectangular sheet of given area with margins marked off along its top and bottom edges and along its two side edges, and an inner dashed rectangle representing the actual printable area once the margins are excluded, whose two side lengths are shown reduced from the full sheet's width and length by …
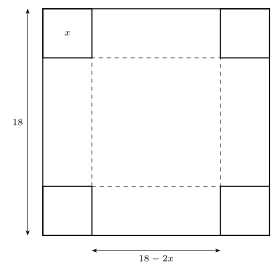
Worked Example 4 — Open box from a square card. An cm square card has equal squares of side cut from its corners and the sides folded up (see Fig. 2.4.6); maximise the box's volume. Base side , height , so . (rejecting , which makes the base side zero or negative). ; at : maximum. Maximum volume cubic units.
Drawn by us to help you understand the concept clearly, and verified to make sure it's accurate. For exams, practice from your textbook's own diagram.
What this figure shows. This figure accompanies the open-box worked example. It shows a flat square card of side 18 cm with a small square of side marked and cut away at each of its four corners, together with dashed fold-lines along which the four remaining rectangular flaps are folded upward to form the walls of an open box, with the uncut central square becoming …
Worked Example 5 — Triangle with two fixed sides. With two given sides of a triangle (see Fig. 2.4.7), find the included angle that maximises the area. ; . , which is negative at maximum. So the area is greatest when the included angle is a right angle (equivalently, is maximised at , where ).
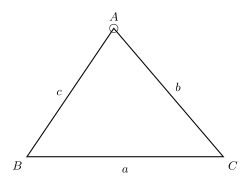
Drawn by us to help you understand the concept clearly, and verified to make sure it's accurate. For exams, practice from your textbook's own diagram.
What this figure shows. This figure accompanies the triangle-area worked example. It shows a triangle with the two given side lengths and drawn out from the common vertex , and the included angle at (between these two sides) marked with an arc — this is the angle that is allowed to vary in order to maximise the triangle's enclosed area. …
…