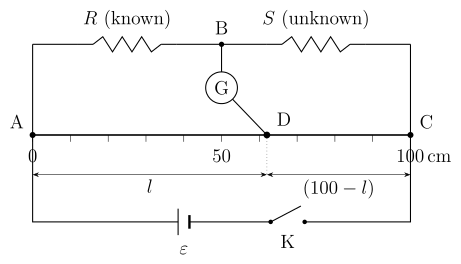
Q.Explain the principle of working of a meter bridge. Draw the circuit diagram for determination of an unknown resistance using it.
You're viewing a preview — the full solution, concept, methods & PYQ mapping are locked.
Start your 14-day free trial to unlock the full solution →A meter bridge works on the principle of a Wheatstone bridge, using a 1 m long uniform wire to compare an unknown resistance with a known standard resistance. The unknown resistance is found from the balance condition: , where is the known resistance and is the balance length (cm) measured from the end near .
The Concept and Intuition
The meter bridge is a practical application of the Wheatstone bridge — a circuit that compares two resistances by balancing the current through a galvanometer. The key insight is that a long, uniform wire of constant cross-section has resistance proportional to its length. By sliding a contact along this wire, you effectively create two variable resistors in series, whose ratio can be adjusted until the bridge is balanced.
Why does this work? When the bridge is balanced, no current flows through the galvanometer. At that point, the ratio of the two resistances on one side equals the ratio of the two resistances on the other side. Since the wire is uniform, the resistance of each segment is directly proportional to its length. So instead of measuring resistance directly, you measure a length — which is far easier and more accurate with a simple scale.
A common mistake is to forget that the wire's total length is 100 cm. If the balance point is at cm from one end, the other segment is cm, not cm from the other end. Always check which end corresponds to which resistance.
Step-by-Step Working
-
Circuit Setup
The meter bridge consists of a 1 m long uniform wire (usually constantan or manganin) stretched along a metre scale between two thick copper strips. The known resistance (from a resistance box) is connected in the left gap, and the unknown resistance is connected in the right gap. A galvanometer is connected between the junction of and and a sliding jockey that can touch any point on the wire. A cell with a key is connected across the two ends of the wire to drive current through the circuit.
-
Finding the Balance Point
Close the key to pass current through the circuit. Slide the jockey gently along the wire until the galvanometer shows zero deflection. This is the balance point, at a distance cm from the left end (the end near ). The wire segment from the left end to the jockey has length cm, and the remaining segment from the jockey to the right end has length cm.
-
Why Zero Deflection Means Balance
At balance, no current flows through the galvanometer. This implies that the potential difference between the left end of the wire and the jockey equals the potential drop across , and similarly for the right side. The circuit then behaves like a Wheatstone bridge where the two wire segments act as the ratio arms.
-
Applying the Wheatstone Bridge Condition …
Unlock everything free for 14 days
- Full step-by-step solutions
- Concept-first explanations
- Methods, shortcuts & mistakes
- PYQ mapping + timed mock tests
Full access for 14 days. No credit card required.